The PowerSyncPro Scheduler is Dynamically built by the tool. If you are an old hat in the migration space and you took a look at the scheduler screenshot in the previous post, you might have wondered how much work it was going to take to build out that schedule. The answer is None, unlike so many of the other AD/Microsoft Entra ID migration tools out there.
That is not to say that you can’t edit the default schedule – like everything in Power Sync Pro, the schedule can be tailored to your specific migration needs.
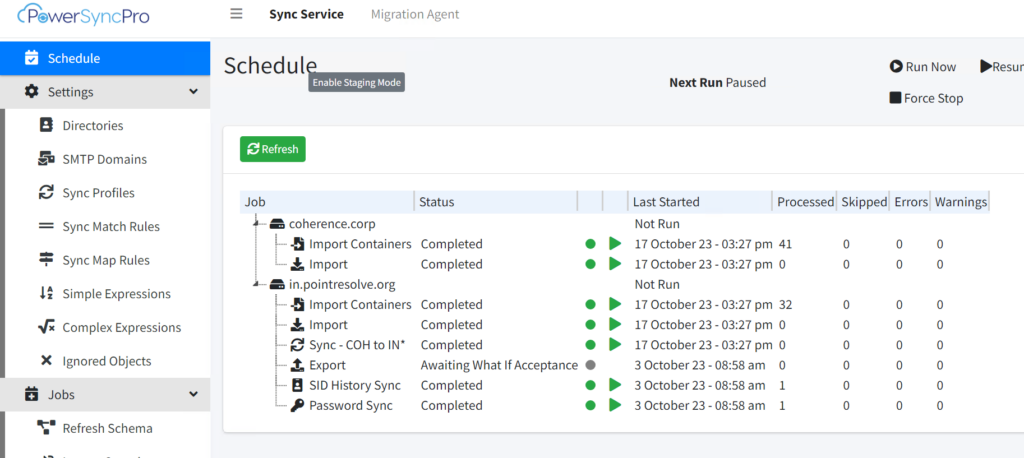
Let’s take another look at the scheduler screenshot, and then talk through some of the options present on the screen:
The PowerSyncPro Scheduler is Dynamically built by the tool. If you are an old hat in the migration space and you took a look at the scheduler screenshot in the previous post, you might have wondered how much work it was going to take to build out that schedule. The answer is None, unlike so many of the other AD/Microsoft Entra ID migration tools out there.
That is not to say that you can’t edit the default schedule – like everything in Power Sync Pro, the schedule can be tailored to your specific migration needs.
Let’s take another look at the PowerSyncPro Scheduler screenshot, and then talk through some of the options present on the screen:
Staging Mode: Starting at the top of the page, you see a button labeled “Staging Mode”. With this turned on, everything in the schedule is in test mode – no data will be written.
Next Run: To the right of the Staging Mode button, you have a Next Run option. In my screenshot, it says “Paused”. That is because, in my lab, I often have to create the situations I want to test. However, in normal production, changes are being made all the time. However, if you do need to pause the schedule (or in this case resume it), you can.
Pause Schedule/Resume Schedule – if, at any point, you need to pause your schedule, all you have to do is click on the Pause Schedule button that is just to the right of the Next Run field. This will pause and, when ready, resume the entire sync process.
Run Now – Backtracking a bit to the left is the Run Now option. Sure, you could wait for the sync job (or selected sync step) to run when the schedule gets to it, but, for all of the impatient people out there, you can always just click on the Run Now to kick things off.
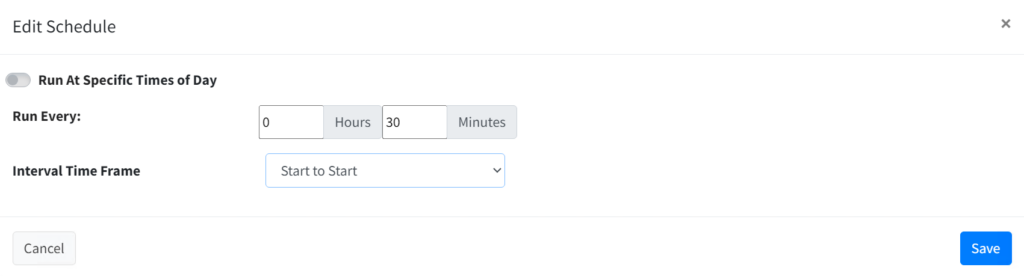
Edit Schedule – And of course, the Edit Schedule button in thePowerSyncPro Scheduler allows you to configure the schedule to your needs. You can have it run at a particular time of day, every so many minutes, and within every so many minutes, you can tell if you want that time period to be Start to Stat or Finish to Start.
What if you don’t want your sync processes to be auto-built and run for you? There is a place for that as well, though that is at the Sync Profile level. For each sync profile, you have a choice to say if you want it included in the Auto Schedule or not. Right at the top of your Sync Profile is the option to Exclude From Schedule.
As with many components in the PowerSyncPro suite, it may seem like a little thing, but for us full-time migration engineers, the automation and ease of use are substantial.
Staging Mode: Starting at the top of the page, you see a button labeled “Staging Mode”. With this turned on, everything in the schedule is in test mode – no data will be written.
Next Run: To the right of the Staging Mode button, you have a Next Run option. In my screenshot, it says “Paused”. That is because, in my lab, I often have to create the situations I want to test. However, in normal production, changes are being made all the time. However, if you do need to pause the schedule (or in this case resume it), you can.
Pause Schedule/Resume Schedule – If, at any point, you need to pause your schedule, all you have to do is click on the Pause Schedule button that is just to the right of the Next Run field. This will pause and, when ready, resume the entire sync process.
Run Now – Backtracking a bit to the left is the Run Now option. Sure, you could wait for the sync job (or selected sync step) to run when the schedule gets to it, but, for all of the impatient people out there, you can always just click on the Run Now to kick things off.
Edit Schedule – And of course, the Edit Schedule button in the PowerSyncPro Scheduler allows you to configure the schedule to your needs. You can have it run at a particular time of day, every so many minutes, and within every so many minutes, you can tell if you want that time period to be Start to Stat or Finish to Start.
What if you don’t want your sync processes to be auto-built and run for you? There is a place for that as well, though that is at the Sync Profile level. For each sync profile, you have a choice to say if you want it included in the Auto Schedule or not. Right at the top of your Sync Profile is the option to Exclude From Schedule.

As with many components in the PowerSyncPro suite, it may seem like a little thing, but for us full-time migration engineers, the automation and ease of use are substantial.